Using WPA for a more secure wireless connection

Monday, August 15, 2011 Labels: , ,


Using WPA for a more secure wireless connection

Wi-Fi Protected Access, or WPA, is a new, improved security standard for wireless connections. WPA has addressed the weaknesses of WEP; it was developed to create a viable alternative to WEP that is more secure than that standard. The fundamentals are the same between the standards, but WPA has improved some of the various mechanisms that plagued WEP. For example, encryption keys are now dynamic and change often automatically. Additionally, the complexity of the encryption key has also been increased to help fight off users who try to derive a key from data that they capture. One of the largest improvements in WPA is the addition of authentication to the wireless connection. Now, users have to have the right encryption settings, as well as a valid username and password, to gain access to the network.

This new standard is just starting to gain momentum. Microsoft has released a special patch for Windows XP that adds this new standard to Windows. However, installing the patch will not allow you to use this new standard. Just as with WEP, WPA is programmed into the firmware of the hardware components. In order to use WPA, you must have hardware that specifically supports it. Currently, only a few companies offer base stations and wireless adapters that support this new method of security. However, that will change in time.

The next time you are considering purchasing a wireless base station and adapter, do some research and pick one that supports WPA to ensure that your wireless communications will not be decrypted and your privacy is secure.

Tags : Using WPA for a more secure wireless connection, Network Security, Wireless Connection

Read More >>

Using WEP for secure communication

Labels: , ,

Using WEP for secure communication

Wired Equivalent Privacy, or WEP, is the first security standard for wireless networks. The basic concept for WEP security is to encrypt the data that is sent back and forth between the access point and the client adapter. This is done using various degrees of encryption strength. A special key, known as the encryption key, is used by computers to connect to a WEP-protected wireless network. This allows the client computer's adapter to be able to decrypt and also send
encrypted messages in the same language as the base station.

This standard sounds like a great way to secure a wireless network. However, it presents some flaws. The largest one is that the whole system relies on just one key. If someone's laptop is stolen that is part of a corporate network, the encryption key must be changed for the base station and for all of the other computers using the wireless connection. This change is necessary because the current encryption key could be easily extracted from the system settings.
Additionally, someone can potentially derive the encryption key by carefully analyzing the data they intercepted.

If you have a wireless base station, I highly recommend that you enable WEP to protect your home. Setting up WEP is different on every set of hardware, but the following are the basics:

1. Connect to your base station setting remotely using your Web browser. This address and port number varies, but usually is http://192.168.1.1 or http://192.168.2.1. Often, the port number is changed to 8080 so people donÕt think you have a Web server running. In that case, try http://192.168.1.1:8080 or http://192.168.2.1:8080.

2. Once you connect, you usually are asked for a password. For all Linksys hardware, the Username field is left blank and the password is admin. Other hardware manufacturers use some sort of a variation of the above. It also would be a good idea to change the password to something other than admin when you are working in the administration settings.

3. Locate the WEP settings and specify the encryption strength in bits. Then, come up with an encryption key and type that in. Write down your encryption key and strength for use in step 5.

4. Save your changes. You can now close the Web administration site.

5. The last part of setting up WEP is configuring the client computers that will connect to the base station. Once again, this information varies, depending on your wireless card. Consult the manual for your card to find out how to set up your card to use WEP.

Setting up WEP will greatly increase the security of your wireless network. Even though there are some flaws, it is much better than using no protection at all. It has the same effect as a car alarm. If a burglar has to choose between a car that clearly has an alarm or one that doesn't, which one will they choose to break into?

Tags : Using WEP for secure communication, Network Security
Read More >>

Disabling Messenger Service

Labels: ,


Disabling Messenger Service

Microsoft has included a service in the last few versions of Windows that allows system administrators to send pop-up messages to all computers on a local network. This service can be an invaluable resource for administrators who want to get the word out about some upcoming server maintenance. For example, end users would see a message pop up on their screens that notifies them that the work group file server will be inaccessible for the next hour while routine maintenance is performed.

This is a great service n when it is used correctly. Unfortunately, the Messenger Service has been abused. Just because any user can send messages to the entire work group doesn't mean that she or he should. This capability is sometimes not a good thing. Users that are part of large local area network, such as just about every Internet user, can send out a mass message to all users in the same subnet. As you can imagine, some users that know how to use the service have started to
abuse it by sending spam to all the users in their same subnet. Nowadays, you may get spam not only in your inbox but also in a pop-up window that could appear at any time.

The Messenger Service, just like any other service or program that is accessible to the outside world, increases your security risk. Although there is currently not an exploit for the Messenger Service that allows remote users to execute commands on your computer, who knows what the future will hold? To be safe, it is best to just disable this service. You will also be cutting down on a new type of spam.

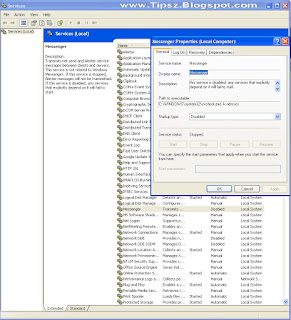
Disabling the Messenger Service can be done by using the Service Manager. Follow these steps to get started:

1. Click the Start button and select Run.

2. Key in services.msc in the box and click OK.

3. The Services Manager will load. Scroll though the list and right-click Messenger and select Properties.

4. Change the Startup Type to Disabled.

5. Click the Stop button and then click OK to save your changes.

Now the Messenger Service is one less thing to worry about. You can kiss the annoying pop-up text ads goodbye and also reduce your risk for an attack in the future.

Tags : Disabling Messenger Service, Messenger
Read More >>

Disabling Remote Desktop connection

Labels: ,

Disabling Remote Desktop connection

The Remote Desktop feature of Windows XP is a great way to be able to access your
computer when you are away from the office or home. However, if you have poor computer security, the Remote Desktop also is a great way for anyone to be able to access and control your whole computer. Remote Desktop is a very risky application to leave exposed to the world. Its security relies solely on your account password, which for most users is easy to guess.

If you do not use Remote Desktop, then it would be a good idea to disable the feature. Doing so is a snap. Just follow these steps to turn it off:

1. Right-click the My Computer icon on the desktop or in the Start Menu and select
Properties.

2. Click the Remote tab to expose the remote access settings.

3. Next, uncheck the box under Remote Assistance.

4. Uncheck the box under Remote Desktop as well.

5. Click OK to save your changes.

When Remote Desktop connections are disabled, you have one less thing to worry about namely, someone having the ability to break into your computer.

Tags : Disabling Remote Desktop connection, Remote Desktop
Read More >>

Configuring Windows firewall

Labels: ,


Configuring Windows firewall

Configuring the firewall to allow certain programs to work through it is not always the best thing to do, because it will expose your computer more to the outside world and increase your risk of getting infected with something. However, in the short term or for an application that you must use, you can make it work through the firewall. In the original version of the firewall, the only possibility was to specify a port number to open. Now, it is much easier to make an application work though the firewall. Instead of typing in a port number, users can just select the program on their computer that they want to have accessed through the firewall.

This capability makes the firewall configuration much more user-friendly. Additionally, in Service Pack 2, Microsoft left in the old way to open up the firewall manually by entering in a port number, so that users still have total control if they really want it. The end result of these two methods is the same; the only difference is the ease of use for less experienced Windows XP users.

Using the new feature to open up holes in the firewall is pretty cool. Follow these steps to open up the firewall for a specific application:

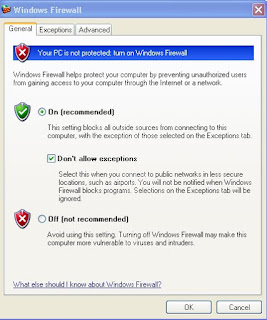
1. Open up Network Connections again by clicking the Start Menu and selecting Run. Then, type firewall.cpl in the box and click OK.

2. When the Windows Firewall settings window loads, click the Exceptions tab.

3. You will see a list of all of the different exceptions that are currently enabled, as signified by the check in the box. By default, a few applications will be enabled. I recommend that you uncheck all of the entries unless you use them. If not, then you are just taking an unnecessary risk by leaving those doors open.

4. If you want to add an application to the exception list so that it will be able to accept connections and data from the outside world, such as an Instant Message program that wants to receive files from other users, just click the Add Program button.

5. Select the name of the program from the list or click the Browse button on the Add a Program window to select the executable of the application that you want to open to the world.

6. When you are finished selecting the program that you want to be able to access through the firewall, click OK and it will appear on the list.

7. Now that the program is on the list, just check the box next to the name to open up the firewall for the application.

8. Click OK to activate your new firewall settings.

Windows Firewall also includes settings on how you want your computer to respond when several different standard Internet messages are sent to it. For example, one setting you can specify is the ping command, which is a network command used to estimate turnaround time between sending data to a computer and receiving a response. All of these settings are found on the Advanced tab by clicking the Settings button under the ICMP section. The screen is pretty straightforward. If you want your computer to have a stealth presence on the Web, as I mentioned earlier, you should uncheck all of the entries listed on the ICMP tab.

Tags : Configuring Windows firewall, Windows Read More >>

Disabling Unneeded Protocols

Labels: ,

Disabling Unneeded Protocols

With every computer comes programs installed that you do not need. As with extra programs taking up space, extra protocols are just wasting your network connection and can actually slow it down. How is this possible? By default, a few different protocols are installed on your computer to allow for maximum compatibility with other computers on a network; these protocols each require bandwidth to operate. Most users will not use too many protocols, and their computers will use up a portion of their connection as they respond and transmit information for these protocols.

Additionally, with extra protocols installed on your network adapter connected to the Internet, you increase your risk of security-related problems. One of the most common risks for broadband users is that they have the Client for Microsoft Networks networking protocol enabled on their connection. This protocol allows everyone in their neighborhood to connect to the users computers and view any files that they may be sharing. This fact alone should be a good enough reason for you to turn off the extra protocols. But with them disabled, you will also save a little bandwidth as well.

Viewing protocols on your network adapters


Viewing the protocols installed and active on your various network adapters is easy. Just follow
these quick steps and you will be viewing them in no time:

1. Right-click the My Network Places icon on the desktop or in the Start Menu and select
Properties. If the My Network Places icon is not in either of those locations, then go to the Control Panel and click the Network Connections icon that is shown under the Classic view.

2. Next, right-click the network adapter with which you want to view the network proto
cols and select Properties.

3. This will bring up a list of the protocols installed as well as active on your adapter, as
Figure 11-11 shows. The protocols that are installed but not active are indicated by the absence of a check in the checkbox.

Disabling a specific protocol


Now that you have the list of installed and active protocols on your screen, you are ready to dis
able a protocol. To do so, just click the check box to remove the check. Then click the OK button and the protocol is no longer active on the network adapter. I highly recommend that you disable all protocols except for the TCP/IP protocol (also referred to as the Internet Protocol). Doing so will optimize your adapter for speed and security.
Be aware that if you remove the Client for Microsoft Networks protocol and the file-sharing protocol, you will no longer be able to share your files. Additionally, you will no longer be able to connect to remote computers to view their shared files.

Also keep in mind that if you have multiple adapters in your machines, such as a wireless
adapter, a wired network adapter, and a dialup modem, you will have to repeat the preceding instructions for each adapter.

Tags : Disabling Unneeded Protocols, Protocols

Read More >>

Assigning Alternative IP Addresses

Labels: ,

Assigning Alternative IP Addresses

One of the most common network-related delays occurs in the last moments of the system startup. The majority of computer users use dynamic network card configuration. There is nothing wrong with this feature, but under certain configurations, the user can experience delays when getting an IP address.

Every time you turn on your computer, it has to set up the IP configuration. Often, this setup can result in your computer pausing for moments during the loading process. The delay is a result of your PC waiting for the DHCP server (a DHCP server dynamically assigns addresse to computers connected to a network), which is the provider of the network information, to respond. In other situations, a user can experience a delay when a DHCP server is not present on the network.

If you use a dialup connection to the Internet, your computer will rely on getting a dynamic IP address from your service provider when you connect. When you first turn on your computer, it will search for a DHCP server to get an address for the local networking components of the operating system. This is occurring when your computer is still in the early boot stages and is not connected to your dialup ISP (Internet Service Provider). Because you are not connected to a network that has a DHCP server, such as when you are dialed up to your Internet provider, your computer may experience a delay, as the computer is searching for a DHCP server when there really is none available.

This hack will only work for users that have network cards and modems installed. It does not apply to users that just have modem connections to the Internet.

One easy solution to this problem is to assign alternative information to your network card. This task is actually pretty easy, as it does not require any major tampering. Follow these steps to specify an alternative IP configuration for your computer:

1. First, get into Network Properties. This can be accomplished by going to the Control Panel through the Start Menu.

2. Once you are in the Control Panel, make sure that you are in the Classic View,
and open Network Connections. If you are not in Classic View, just click the button on the left that states Switch to Classic View.

3. Now that you are in the Network Connections window, you will see a list of network adapters on your computer. Right-click the icon to which your network connection is hooked up and select Properties.

4. Doing so will launch a new window that lists the different protocols installed on the network card. Click the Internet Protocol (TCP/IP) to select it. Then click the Properties button.

5. Once the Internet Protocol (TCP/IP) Properties window is displayed, click the
Alternative Configuration tab. This is where you will have to enter in your data.

6. First, you will have to click the User Configured radio button to allow the text boxes to be edited.

7. Next, type in an IP address for your computer that will be used for the sake of speed in the event that your computer cannot get a DHCP address because you are using a dialup Internet connection. I recommend you use 192.168.1.X. Replace X with any unique number for each computer between 2 and 254. The exact IP address numbers that you choose do not matter. You just want to have a valid IP address filled in so that your

computer does not waste too much time looking for a DHCP address when there is no DHCP server giving out the address on your network.

8. Then, type in 255.255.255.0 as your Subnet Mask.

9. Your Default Gateway should be set to 192.168.1.1 because that is a valid gateway address. As I mentioned earlier, the exact numbers do not matter. We just want to have the computer assign some value instead of spending time searching when it will not find a DHCP server.

10. Then, enter in what your DNS servers should be. You can ask your ISP what they should be. But this information really isn't essential, as this configuration will almost never be used to connect to the Internet. It is just a default fallback in the rare case that you are having networking trouble. Feel free to leave these fields blank, as well as the WINS fields.

11. Click the OK button and then click the OK button for the network properties screen.

That's it; you are now finished.

Tags : Assigning Alternative IP Addresses, IP Address
Read More >>

Followers