
Hi see you again, I will now discuss what it is little bit snich on mac and how to install it. Little Snitch is a third-party application for Macintosh computers that monitors information sent by other applications in order to protect your privacy. As you use the Internet and run applications,Little Snitch will work in the background to monitor all activity and alert you if an application is attempting to send your protected information. When using Adobe software, Little Snitch will prompt you asking what action to take due to Adobe's frequent sending of user information to its server. In order to use Adobe software and Little Snitch simultaneously, you'll need to add Adobe to Little Snitch's trusted applications list.

INTRODUCTION :
1. Open the "Applications" folder in Finder and double-click the "Little Snitch" icon to run the application.
2. Click the "New" button in the Little Snitch window, and click the down arrow icon.
3. Click "Choose Application" from the drop-down list, and click the Adobe application you wish to add to the list of approved applications list. Click the "Choose" button.
4. Click the drop-down list at the top of the window, and click "Allow Connections." Click the "OK" button to complete the setup.
Related Post :
what is little snitch, how to used little snitch on mac OS
Read More >>
Macintosh : How to Install Little Snitch on Mac for Adobe
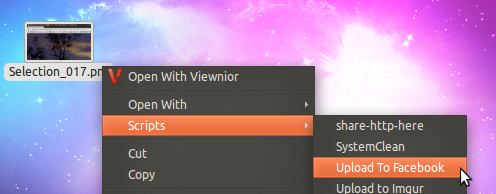
Linux : Ubuntu : The easy way to upload photos to Facebook with Nautilus
This time there is a new alternative to upload photos to Facebook directly using nautilus, a very easy way for you who like to upload photos without having to open the browser application.
First download the application tarball@gtk-apps.org
Extract the file to your computer
Double-click on the script 'install' in and select 'Run' requested.
You can now right click on the photo and select 'Upload to order' form menuscript.
When first run you will be asked to 'Authorize' application for uploading photos to your facebook wall.
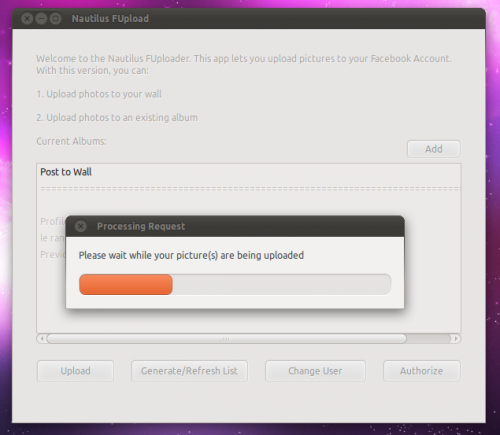
You will then see a confirmation pop-ups.
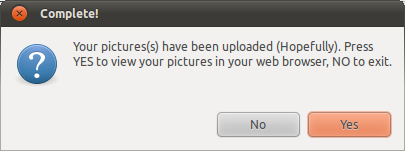
Was successful in uploading photos easy right? Well congratulations have fun with simple image upload with this nautilus.
Related Post :
Upload foto width ubuntu, upload foto width ubuntu using nautilus, Beautiful terminal width nautilus
Read More >>
Linux : Ubuntu : Beautify terminal with nautilus
Nautilus Terminal is an extension to Nautilus that allows us to present the Terminal directly in File Manager is a native Ubuntu. We can also hide the terminal if it is not needed. Nautilus Terminal also comes with a fairly complete configuration window. Configurations that can be arranged include colors, fonts, folders, and others. Additionally, Nautilus Terminal also has a short button to help us use this application.

The Ubuntu users can install the Nautilus Terminal in the following way: Open Terminal and type:
sudo add-apt-repository ppa:flozz/flozzsudo
apt-get updatesudo apt-get install nautilus-terminalnautilus -q
As for friends who do not have Internet connection, my friends can download it manually PPA
Related Post :
Beautiful terminal ubuntu, install nautilus, how to install nautilus?,
Read More >>
Linux : Ubuntu : 5 Perintah yang Sering digunakan di Terminal?
Sewaktu jalan-jalan di dunia maya, saya nemuan sebuah artikel tentang perintah apa sajakah yang sering digunakan di dalam terminal? nah semakin penasaran langsung saja buka deh tuh blog, ternyata 5 perintah apa saja yang sering digunakan di terminal tersebut merupakan suatu survey yang di lakukan oleh seorang jerman yang di lakukan di milis-milis dan forum-forum linux yang ada, serta di twitter. Dan akhirnya terpilihlah 5 perintah apa saja yang sering digunakan di terminal.
Berikut ini 5 perintah yang sering digunakan di dalam terminal :
1. $ sudo
jelas saja sudo menempati peringkat yang pertama, perintah sudo selalu digunakan sewaktu kita mau memasuki root di linux kita dan perintah sudo sangat penting.
2. $ cd
Perintah cd sangat sering digunakan, Secara default terminal membuka folder home pada saat membuka pertama kali, dan untuk berpindah ke folder lain memerlukan perintah cd.
contoh : $ cd /media/master
3. $ ls
Ini adalah suatu perintah untuk mengetahui isi dari suatu folder menjadi tempat ketiga. Ada banyak kombinasi untuk perintah ls ini dan dapat di sesuaikan dengan kebutuhan kita.
ls digunakan mengetahu list dari directory tapi tidak termasuk file header
ls -l -a selain untuk list file dari suatu directory tapi juga file hidden serta permission dari file
4. $ apt-get install
Sewaktu kita ingin menginstall sesuatu entah itu program atau aplikasi yang ada di linux secara online, yang pertama dilakukan kita harus mengetikkan $ apt-get install dan itu hukumnya wajib, contoh nya saja $ apt-get install python.
5. $ uname -a
Perintah yang satu ini digunakan untuk mengetahui versi dari kernel yang berjalan di ubuntu kita.
Itulah 5 perintah yang sering digunakan di terminal, semoga bermanfaat.
Realted Post :
apa saja ya perintah yang sering kita gunakan di terminal?, perintah yang sering digunakan di terminal, Character map on ubuntu, How to install python 3.1, How to install gcalctool on ubuntu
Read More >>
Linux : Ubuntu : Character Map On Ubuntu
Character Map
With Character Map, you can select a large range of non-standard and international characters to put in your documents.
Menu: Accessories > Character Map
Screenshot

Installation
Part of the default Ubuntu installation
Related Search :
charcter map, character map on ubuntu, how to install character map, how install character map on ubuntu, whats is character map?, how to install character map using terminal, how to install character map using terminal on ubuntu
Read More >>
Linux : Ubuntu : How to install Gcalctool on ubuntu
Introduction to gcalctool
gcalctool is a powerful graphical calculator with financial, logical and scientific modes. It uses a multiple precision package to do its arithmetic to give a high degree of accuracy.
Package Information
Download (HTTP): http://ftp.gnome.org/pub/GNOME/sources/gcalctool/5.5/gcalctool-5.5.42.tar.bz2
Download (FTP): ftp://ftp.gnome.org/pub/GNOME/sources/gcalctool/5.5/gcalctool-5.5.42.tar.bz2
Download MD5 sum: 0f42e6e437f64c844b7b30e3255b02aa
Download size: 1.0 MB
Estimated disk space required: 16 MB
Estimated build time: 0.2 SBU

gcalctool Dependencies
Required
libgnomeui-2.10.0 and ScrollKeeper-0.3.14
Installation of gcalctool
Install gcalctool by running the following commands:
./configure --prefix=`pkg-config --variable=prefix ORBit-2.0` \
--sysconfdir=/etc/gnome --localstatedir=/var/lib &&
make
This package does not come with a test suite.
Now, as the root user:
make install
Command Explanations
--sysconfdir=/etc/gnome: This switch puts configuration files in /etc/gnome instead of $GNOME_PREFIX/etc.
--localstatedir=/var/lib: This switch puts ScrollKeeper files in /var/lib/scrollkeeper instead of $GNOME_PREFIX/var/scrollkeeper.
Contents
Installed Programs: gcalctool and gnome-calculator
Installed Libraries: None
Installed Directories: /etc/gnome/gconf/gconf.xml.defaults/apps/gcalctool, /etc/gnome/gconf/gconf.xml.defaults/schemas/apps/gcalctool, $GNOME_PREFIX/share/gnome/help/gcalctool, and $GNOME_PREFIX/share/omf/gcalctool
Short Descriptions
gcalctool
is a desktop calculator for GNOME.
gnome-calculator
is a symlink to the gcalctool program.
Related Search :
what is gcalctool, install gcalctool, gcalctool, how to install gcalctool, gcalctool on ubuntu, install gcalctool using terminal, install gcalctool using terminal on ubuntu Read More >>
Linux : Ubuntu : How to Install Python3.1 on Ubuntu
Python is a programming language which makes it easy to create anything from small, useful tools to full-sized applications. The good news is that Ubuntu has excellent support for Python right out of the box. The great news is that you can get started right away using the advice and sample code in these Python recipes!
The aim of these recipes is to provide examples of useful Python code which you can use to learn more about Python, and to provide code which you can use as building blocks for writing your own software. All of the example code is distributed under a free software license, so you can use it in your own projects.
![]()
under applications press add and remove...
search for IDLE
look for the IDLE with Python version3 on it not the 2.5 or 2.6 version... add it and go to applications programming to run it...
to set IDLE as the default open option for .py files...
1) right click on a .py file...
2) go to properties.
3) go to the open with tab.
4) left click + add.
5) left click custom command.
6) left click browse.
7) locate the file idle-python3.0 in the directory /usr/bin/.
8) add that as the default and it will open up an IDLE shell every time you double click on a .py file...
yay Ubuntu Linux....
the irony is that currently i'm doing very little programming on my ubuntu computer. i use it for web surfing... currently i'm on my 64-bit vista computer....
Little tip for python 3.1: it won't recognize the module Tkinter it is renamed to tkinter...
Related Search :
install python on ubuntu, how to install python 3.1 using terminal, make install python on backtrack, python 3.1, install python 3.1, installing python on ubuntu, How to install python using terminal on ubuntu
Read More >>