Saying no to Encrypted Web Pages in Internet Explorer
If you manage your finances or shop online, then you have probably had experience with using secure Web connections, otherwise known as SSL. These secure connections encrypt the data that is transferred from a Web server to your computer. Once the data gets to your computer, your browser has a special key that decrypts the information and displays it on your computer. During this process, when the file is decrypted, it is saved in the Temporary Internet Files
directory so that the browser can display it.
This default appears to be harmless because the Web page is only saved on your computer. If no one has remote access to your computer, the data would be safe, right? Not necessarily, because your data is now vulnerable to anyone who has physical local access to your computer. If that person is clever and lucky enough, he or she can sort through your Temporary Internet Files directory to find confidential information, such as your online banking information. All of this information is saved by default on your hard drive for anyone to look at. They do not even need to know your password or even log into your account on the bank's Web site, because a snapshot of the Web page is stored locally on your computer.
What can you do to protect your computer from this vulnerability besides setting up better computer security such as complex passwords? There is a cool feature of Internet Explorer that you just have to turn on that will eliminate the problem completely. Simply called Do Not Save Encrypted Pages to Disk, this feature, when enabled, will solve your problems. To enable it, follow these steps:
1. Open Internet Explorer.
2. Click Tools and select Internet Options.
3. Then, select the Advanced tab.
4. Scroll down through the list toward the bottom of the window until you see the Security section.
5. Locate Do Not Save Encrypted Pages to Disk, and check the box to the left of it.
6. Click OK to save and activate your changes.
Now you will no longer have to worry about pages that were encrypted being saved to your drive for anyone who has access to your computer to see.
Tags : Saying no to Encrypted Web Pages in Internet Explorer, Internet Explorer
Read More >>
Powered by Blogger.
Categories
- Android (21)
- Animal (1)
- Application Android (7)
- Biology (4)
- Blogger (3)
- Computer (1)
- Conspiracy (1)
- Crop Circle (1)
- Download (1)
- Email (1)
- Food (3)
- Football (1)
- gadgets (2)
- Health Tips (3)
- Hollywood (1)
- Hosting (1)
- Internet (30)
- Internet Marketing (4)
- Islam Religion (1)
- Linux (9)
- Lyrics (6)
- Macintosh (1)
- mobile (3)
- Network Security (2)
- News (32)
- News. Celebs (2)
- PSSI (1)
- Ramadhan (7)
- Sains (2)
- Security (1)
- SEO (1)
- Showbiz (4)
- Smadav (1)
- Smartphone (1)
- Technology (6)
- Tips and Trik (26)
- Tips n Triks (3)
- Tourism (4)
- Ubuntu (8)
- World (1)
Blog Archive
-
▼
2011
(113)
-
▼
August
(73)
-
▼
Aug 18
(12)
- Android : 2011, 15% Tablet ahold Android Market
- Android : Sharp 3D LYNX Android Smartphone 3.8-inc...
- Android : Barnes And Noble Android Nook Color gets...
- Android : Like What Specifications Nexus S?
- Android : Huawei's Low-cost IDEOS Android Phone Co...
- Android : Google Maps 5.0 for Android Adds 3D, Off...
- Android : Acer's Android tablet (and its gyroscope...
- Android : Axioo Pico Pad 7 Inch Enters Tablet Market
- Android : 8 Alasan OS Android Kuasai Dunia
- Android : Android Galaxy Mini Dibanderol Rp 1,6 Juta
- Android : Customizing the Action Bar
- Android : PIX: Top 5 Android Honeycomb Tablets
-
▼
Aug 18
(12)
-
▼
August
(73)
Feedjit
Total Pageviews
Saying no to Encrypted Web Pages in Internet Explorer
Tuesday, August 16, 2011
Labels:
Internet,
Tips and Trik
Posted by chanchandrue at 12:01 AM 0 comments
Clearing temporary Internet files and cookies
Monday, August 15, 2011
Labels:
Internet,
Tips and Trik
Clearing temporary Internet files and cookies
Every time you visit a Web site, the files for the Web page, such as the HTML and the images, are downloaded and stored in a temporary directory known as Temporary Internet Files. Over time, this directory can become full of images and HTML from various Web sites that you have visited. This directory can end up taking up a lot of space on your hard drive. Additionally, a user can browse your Temporary Internet Files directory and find out exactly what site you have been visiting just as if they were looking at your browser history. If you are concerned about your privacy, or just concerned about disk space, then clearing the Temporary Internet Files is a must.
Cookies are another item that is created on your computer when you visit a Web site. Contrary to popular belief, cookies are really not that bad. Most Web sites use them to save user data to a browser. One example of this is site preferences or automatic logon when you visit a Web site. The Webmaster of the Web site can detect if their Web site has already given you a cookie that has your user ID stored in it. If it finds one, then it knows exactly who you are and logs you on automatically. Advertisers also use cookies to store personal data. Instead of showing you the same advertisement 50 times, they use cookies to keep track of how many times an advertisement is displayed on your screen.
A common myth about cookies is that they allow Web sites to track other sites you visit. That is just not true. The only cost of having cookies on your computer is a privacy concern for local users. Any user that has physical access to your computer can browse to the directory that the cookies are stored and view what Web sites you visit because the cookies are named after the Web site that instructed your browser to put them on your computer.
Clearing the Temporary Internet Files and removing the cookies is a very simple task. Just follow these steps to clear these files:
1. Open up another copy of Internet Explorer.
2. Click Tools and then select Internet Options.
3. Under the Temporary Internet Files section, click the Delete Files button.
4. You will be prompted to confirm if you would also like offline files to be deleted. For maximum privacy, check the box and Click OK.
5. Once the files are erased, you will be shown the Internet Options screen again. Taking care of the cookies for your privacy is just as easy. Just click the Delete Cookies button.
6. Click OK on the confirmation screen.
7. Select OK once more to close Internet Options and you are done.
Now users will no longer be able to see what Web sites you visit from the cookies and Temporary Internet Files that are stored on your computer. Additionally, you will have freed up some disk space by deleting these files.
Tags : Clearing temporary Internet files and cookies, Internet
Read More >>
Every time you visit a Web site, the files for the Web page, such as the HTML and the images, are downloaded and stored in a temporary directory known as Temporary Internet Files. Over time, this directory can become full of images and HTML from various Web sites that you have visited. This directory can end up taking up a lot of space on your hard drive. Additionally, a user can browse your Temporary Internet Files directory and find out exactly what site you have been visiting just as if they were looking at your browser history. If you are concerned about your privacy, or just concerned about disk space, then clearing the Temporary Internet Files is a must.
Cookies are another item that is created on your computer when you visit a Web site. Contrary to popular belief, cookies are really not that bad. Most Web sites use them to save user data to a browser. One example of this is site preferences or automatic logon when you visit a Web site. The Webmaster of the Web site can detect if their Web site has already given you a cookie that has your user ID stored in it. If it finds one, then it knows exactly who you are and logs you on automatically. Advertisers also use cookies to store personal data. Instead of showing you the same advertisement 50 times, they use cookies to keep track of how many times an advertisement is displayed on your screen.
A common myth about cookies is that they allow Web sites to track other sites you visit. That is just not true. The only cost of having cookies on your computer is a privacy concern for local users. Any user that has physical access to your computer can browse to the directory that the cookies are stored and view what Web sites you visit because the cookies are named after the Web site that instructed your browser to put them on your computer.
Clearing the Temporary Internet Files and removing the cookies is a very simple task. Just follow these steps to clear these files:
1. Open up another copy of Internet Explorer.
2. Click Tools and then select Internet Options.
3. Under the Temporary Internet Files section, click the Delete Files button.
4. You will be prompted to confirm if you would also like offline files to be deleted. For maximum privacy, check the box and Click OK.
5. Once the files are erased, you will be shown the Internet Options screen again. Taking care of the cookies for your privacy is just as easy. Just click the Delete Cookies button.
6. Click OK on the confirmation screen.
7. Select OK once more to close Internet Options and you are done.
Now users will no longer be able to see what Web sites you visit from the cookies and Temporary Internet Files that are stored on your computer. Additionally, you will have freed up some disk space by deleting these files.
Tags : Clearing temporary Internet files and cookies, Internet
Read More >>
Posted by chanchandrue at 11:57 PM 0 comments
Clearing visited Web sites history
Labels:
Internet,
Tips and Trik

Clearing visited Web sites history
Internet Explorer, by default, is configured to record all of the Web sites that you visit for a 30-day period. If you are concerned about your privacy, your browsing history should be cleaned frequently and history settings configured best for privacy. Doing so will ensure that any user of your computer will not be able to easily see what you have been doing. Keep in mind, however, that if you get rid of the browser history, you will eliminate the ability to use the history to go back to Web sites for which you might have forgotten the URL.
That use is really the only reason I can think of that makes the browser history useful. If you can live without that convenience, then follow these steps to clear your history from your PC:
1. Open up a copy of Internet Explorer by using either the icon on the desktop or on the Start panel.
2. Once Internet Explorer is open, click the Tools menu bar item and select Internet Options.
3. Then, just click the Clear History button.
4. Your history will now be cleared. Because you still have Internet Options open on your screen, adjust the amount of days that your browsing history is stored.
5. As mentioned earlier, the default setting for this value is normally 30 days. Highlight the number in the days to keep pages in history box and type in 0 to maximize your privacy.
6. Then, click OK to save your changes and exit the Internet Options screen.
After you have cleared your browser history and modified the history setting, your privacy will be much easier to protect.
Tags : Clearing visited Web sites history, Web Sites
Posted by chanchandrue at 11:52 PM 0 comments
Locking down Internet Explorer
Labels:
Internet,
Tips and Trik
Locking down Internet Explorer
Now that you have removed all of the spyware and adware on your computer, let's turn off certain features of Internet Explorer so that you will be less likely to accidentally install more spyware. To get started, change the ActiveX install settings to prevent any new ActiveX apps to be installed. Follow these steps to change this setting:
1.Open Internet Explorer.
2.Click the Tools menu bar item and select Internet Options.
3.Click the Custom Level button on the Security tab.
4.Locate Download Signed ActiveX Control at the top of the list and select Disable.
5.Click OK and click Yes on the confirmation screen.
6.Select OK once more to close Internet Options.
A change in this setting can prevent you from installing new ActiveX controls from all Web sites, good and bad. If you ever run into some problem with a Web site not loading correctly, just re-enable this setting and try the site again.
Tags : Locking down Internet Explorer, Internet Explorer
Read More >>
Now that you have removed all of the spyware and adware on your computer, let's turn off certain features of Internet Explorer so that you will be less likely to accidentally install more spyware. To get started, change the ActiveX install settings to prevent any new ActiveX apps to be installed. Follow these steps to change this setting:
1.Open Internet Explorer.
2.Click the Tools menu bar item and select Internet Options.
3.Click the Custom Level button on the Security tab.
4.Locate Download Signed ActiveX Control at the top of the list and select Disable.
5.Click OK and click Yes on the confirmation screen.
6.Select OK once more to close Internet Options.
A change in this setting can prevent you from installing new ActiveX controls from all Web sites, good and bad. If you ever run into some problem with a Web site not loading correctly, just re-enable this setting and try the site again.
Tags : Locking down Internet Explorer, Internet Explorer
Read More >>
Posted by chanchandrue at 11:48 PM 0 comments
Using WPA for a more secure wireless connection
Labels:
Internet,
Network Security,
Tips and Trik

Using WPA for a more secure wireless connection
Wi-Fi Protected Access, or WPA, is a new, improved security standard for wireless connections. WPA has addressed the weaknesses of WEP; it was developed to create a viable alternative to WEP that is more secure than that standard. The fundamentals are the same between the standards, but WPA has improved some of the various mechanisms that plagued WEP. For example, encryption keys are now dynamic and change often automatically. Additionally, the complexity of the encryption key has also been increased to help fight off users who try to derive a key from data that they capture. One of the largest improvements in WPA is the addition of authentication to the wireless connection. Now, users have to have the right encryption settings, as well as a valid username and password, to gain access to the network.
This new standard is just starting to gain momentum. Microsoft has released a special patch for Windows XP that adds this new standard to Windows. However, installing the patch will not allow you to use this new standard. Just as with WEP, WPA is programmed into the firmware of the hardware components. In order to use WPA, you must have hardware that specifically supports it. Currently, only a few companies offer base stations and wireless adapters that support this new method of security. However, that will change in time.
The next time you are considering purchasing a wireless base station and adapter, do some research and pick one that supports WPA to ensure that your wireless communications will not be decrypted and your privacy is secure.
Tags : Using WPA for a more secure wireless connection, Network Security, Wireless Connection
Read More >>
Posted by chanchandrue at 11:43 PM 0 comments
Using WEP for secure communication
Labels:
Internet,
Network Security,
Tips and Trik
Using WEP for secure communication
Wired Equivalent Privacy, or WEP, is the first security standard for wireless networks. The basic concept for WEP security is to encrypt the data that is sent back and forth between the access point and the client adapter. This is done using various degrees of encryption strength. A special key, known as the encryption key, is used by computers to connect to a WEP-protected wireless network. This allows the client computer's adapter to be able to decrypt and also send
encrypted messages in the same language as the base station.
This standard sounds like a great way to secure a wireless network. However, it presents some flaws. The largest one is that the whole system relies on just one key. If someone's laptop is stolen that is part of a corporate network, the encryption key must be changed for the base station and for all of the other computers using the wireless connection. This change is necessary because the current encryption key could be easily extracted from the system settings.
Additionally, someone can potentially derive the encryption key by carefully analyzing the data they intercepted.
If you have a wireless base station, I highly recommend that you enable WEP to protect your home. Setting up WEP is different on every set of hardware, but the following are the basics:
1. Connect to your base station setting remotely using your Web browser. This address and port number varies, but usually is http://192.168.1.1 or http://192.168.2.1. Often, the port number is changed to 8080 so people donÕt think you have a Web server running. In that case, try http://192.168.1.1:8080 or http://192.168.2.1:8080.
2. Once you connect, you usually are asked for a password. For all Linksys hardware, the Username field is left blank and the password is admin. Other hardware manufacturers use some sort of a variation of the above. It also would be a good idea to change the password to something other than admin when you are working in the administration settings.
3. Locate the WEP settings and specify the encryption strength in bits. Then, come up with an encryption key and type that in. Write down your encryption key and strength for use in step 5.
4. Save your changes. You can now close the Web administration site.
5. The last part of setting up WEP is configuring the client computers that will connect to the base station. Once again, this information varies, depending on your wireless card. Consult the manual for your card to find out how to set up your card to use WEP.
Setting up WEP will greatly increase the security of your wireless network. Even though there are some flaws, it is much better than using no protection at all. It has the same effect as a car alarm. If a burglar has to choose between a car that clearly has an alarm or one that doesn't, which one will they choose to break into?
Tags : Using WEP for secure communication, Network Security
Read More >>
Wired Equivalent Privacy, or WEP, is the first security standard for wireless networks. The basic concept for WEP security is to encrypt the data that is sent back and forth between the access point and the client adapter. This is done using various degrees of encryption strength. A special key, known as the encryption key, is used by computers to connect to a WEP-protected wireless network. This allows the client computer's adapter to be able to decrypt and also send
encrypted messages in the same language as the base station.
This standard sounds like a great way to secure a wireless network. However, it presents some flaws. The largest one is that the whole system relies on just one key. If someone's laptop is stolen that is part of a corporate network, the encryption key must be changed for the base station and for all of the other computers using the wireless connection. This change is necessary because the current encryption key could be easily extracted from the system settings.
Additionally, someone can potentially derive the encryption key by carefully analyzing the data they intercepted.
If you have a wireless base station, I highly recommend that you enable WEP to protect your home. Setting up WEP is different on every set of hardware, but the following are the basics:
1. Connect to your base station setting remotely using your Web browser. This address and port number varies, but usually is http://192.168.1.1 or http://192.168.2.1. Often, the port number is changed to 8080 so people donÕt think you have a Web server running. In that case, try http://192.168.1.1:8080 or http://192.168.2.1:8080.
2. Once you connect, you usually are asked for a password. For all Linksys hardware, the Username field is left blank and the password is admin. Other hardware manufacturers use some sort of a variation of the above. It also would be a good idea to change the password to something other than admin when you are working in the administration settings.
3. Locate the WEP settings and specify the encryption strength in bits. Then, come up with an encryption key and type that in. Write down your encryption key and strength for use in step 5.
4. Save your changes. You can now close the Web administration site.
5. The last part of setting up WEP is configuring the client computers that will connect to the base station. Once again, this information varies, depending on your wireless card. Consult the manual for your card to find out how to set up your card to use WEP.
Setting up WEP will greatly increase the security of your wireless network. Even though there are some flaws, it is much better than using no protection at all. It has the same effect as a car alarm. If a burglar has to choose between a car that clearly has an alarm or one that doesn't, which one will they choose to break into?
Tags : Using WEP for secure communication, Network Security
Read More >>
Posted by chanchandrue at 11:38 PM 0 comments
Disabling Messenger Service
Labels:
Internet,
Tips and Trik

Disabling Messenger Service
Microsoft has included a service in the last few versions of Windows that allows system administrators to send pop-up messages to all computers on a local network. This service can be an invaluable resource for administrators who want to get the word out about some upcoming server maintenance. For example, end users would see a message pop up on their screens that notifies them that the work group file server will be inaccessible for the next hour while routine maintenance is performed.
This is a great service n when it is used correctly. Unfortunately, the Messenger Service has been abused. Just because any user can send messages to the entire work group doesn't mean that she or he should. This capability is sometimes not a good thing. Users that are part of large local area network, such as just about every Internet user, can send out a mass message to all users in the same subnet. As you can imagine, some users that know how to use the service have started to
abuse it by sending spam to all the users in their same subnet. Nowadays, you may get spam not only in your inbox but also in a pop-up window that could appear at any time.
The Messenger Service, just like any other service or program that is accessible to the outside world, increases your security risk. Although there is currently not an exploit for the Messenger Service that allows remote users to execute commands on your computer, who knows what the future will hold? To be safe, it is best to just disable this service. You will also be cutting down on a new type of spam.
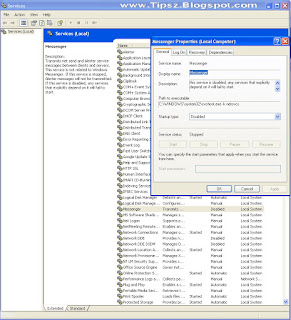
Disabling the Messenger Service can be done by using the Service Manager. Follow these steps to get started:
1. Click the Start button and select Run.
2. Key in services.msc in the box and click OK.
3. The Services Manager will load. Scroll though the list and right-click Messenger and select Properties.
4. Change the Startup Type to Disabled.
5. Click the Stop button and then click OK to save your changes.
Now the Messenger Service is one less thing to worry about. You can kiss the annoying pop-up text ads goodbye and also reduce your risk for an attack in the future.
Tags : Disabling Messenger Service, Messenger
Read More >>
Posted by chanchandrue at 11:30 PM 0 comments
Subscribe to:
Posts (Atom)